WOODFINISHING
Surface Preparation
The first step to a good finish is to make sure the surface the finish will be applied to is free of all defects such as dents, gouges, scratches and milling marks. Most finishes bring out the natural grain and beauty of the wood. Unfortunately, they may also magnify any defects that may have gone unnoticed. What appears to be a minor defect on raw wood will stand out like a sore thumb when a stain or finish is applied.
Common Sense.
Surface preparation should begin before the project is assembled. A fair amount of common sense should be used during construction. For example: any surface that can't be easily reached after assembly should be sanded before assembly. In general attention to detail such as tight joint lines and excess glue squeeze out should be addressed during construction. Excess stain will accumulate between poorly fitted joints and will appear as unsightly dark lines when the finish has been applied. The glue squeeze out should be left to dry and then removed by using a scraper. During construction I am constantly asking myself, "How will this affect the surface when I apply a stain or finish"? Ask yourself this while you work.
Mill Marks
If you wish to build a quality piece of furniture, I recommend buying good quality lumber, free of knots, sap, blemishes etc. If you do so, about the only defect you will have to deal with on the board will be mill marks. When boards are run through a planer, the rotating planer knives take shallow bites out of the wood. Mill marks appear as a series of repeating raised bumps that run across the grain of the board. If the knives are very dull, the marks really stand out, but more often they are less pronounced, in some cases invisible to the naked eye. It's important to note that mill marks are present on every board that has been run through a planer, regardless of quality or source. Sometimes mill marks are very hard to see. If you don't detect and remove them, they will really stand out once a stain or finish has been applied. The best way to sight mill marks or any other minor flaws or defects is to use reflected light. Position a lamp above the work surface at about a 30 degree angle to the surface. You will be surprised when the marks you could not see before now look like mountain peaks and valleys. Overall, the best way to remove mill marks and other minor defects like small surface scratches is by sanding.
Sanding
Choosing The Right Paper
There are several types of sandpaper, some are designed for sanding finishes like lacquer and varnish while others are best for sanding raw wood. Garnet Paper is an orange colored sandpaper that is made of a natural abrasive. It is excellent for sanding raw wood. Another type of paper that is favored by furniture and cabinet makers for sanding raw wood is Aluminum Oxide paper (sometimes known as production paper). This is the standard brownish colored paper found in most hardware and paint stores. Aluminum Oxide is a man made abrasive and will last a little longer than Garnet paper. Either of the two will produce excellent results. The types of paper you want to stay away from for sanding raw wood are the Silicon Carbide (Wet or Dry) paper which is black in color, and the light gray colored papers which are lubricated and used to sand lacquers and other topcoats.
Grits.
Sandpaper is graded by using a number system. The finer the paper, the higher the number. Garnet and Alum. Oxide paper range in grit sizes from 36 (Very Corse) to 240 (Fine).
Choosing A Sander
Over the past few years a variety of sanders have been introduced onto the woodworking market. Some work very well, while others, not so well. The three most common sanders used for surface prep are a belt sander, orbital sander (pad sander) and the most recent random orbital sander. Each sander produces a distinct surface finish. A belt sanderis best used when a lot of material has to be removed from the surface. For example when glued up boards have to be leveled. It is a dangerous tool, make one mistake and you may wind up ruining the workpiece. Even though a belt sander removes stock quickly, I don't think it's worth the risk. The belt sander leaves straight lined scratch pattern. While orbital sanders do not remove stock like belt sanders, some of the heavier models like the Porter Cable Model 330 Speed Bloc will do a great job of removing scratches and milling marks when a piece of 80 grit sandpaper is mounted to it. These sanders leave small orbital scratch patterns that are nearly invisible to the naked eye. When using an orbital sander, don't press down too hard on the worksurface. Let the weight of the machine do the job. Although you can initially sand across grain make sure you take your last passes with the grain to avoid leaving scratch marks on the stock. The random orbital sander is the machine I most often use. Because it creates an orbital as well as revolving motion, it removes stock much quicker than a pad sander and at the same time leaves a scratch pattern that is almost swirl free, even when sanding across grain. To properly use this sander, start it while it is on the wood. If you wait until it is running at full speed before you set it on the work, it may gouge out the surface.
Sanding Sequence
Many woodworkers believe that if you sand the work to a super fine grit, you will
achieve a better finish. This is not true. The only purpose for sanding is to remove mill
marks, tool marks, other defects and to smooth the surface. When sanding, sandpaper leaves
small grooves relative to the grit size of the paper you are using. By sanding with
progressively finer grits you are making these grooves smaller. 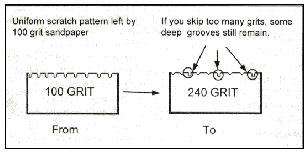 Once
the grooves are small enough so they can't be seen with the naked eye, you do not need to
go any further. While it is not necessary to progressively sand using every available
grit, you should not skip too many grit sizes. Use a grit that is just small enough to
remove the grooves left by the previous paper. I usually use 100 grit to remove milling
marks and any other surface defects, then move to 180 to refine the grooves and finish up
with 240 grit. If mill marks are very pronounced, I will start with 80 grit, then use 120
and finish with 220. Sanding up to 220 or 240 on most woods will make the grooves small
enough so they are naked to the invisible eye. However, there are some species of wood
that may require sanding to a finer grit before the grooves are not visible.
Once
the grooves are small enough so they can't be seen with the naked eye, you do not need to
go any further. While it is not necessary to progressively sand using every available
grit, you should not skip too many grit sizes. Use a grit that is just small enough to
remove the grooves left by the previous paper. I usually use 100 grit to remove milling
marks and any other surface defects, then move to 180 to refine the grooves and finish up
with 240 grit. If mill marks are very pronounced, I will start with 80 grit, then use 120
and finish with 220. Sanding up to 220 or 240 on most woods will make the grooves small
enough so they are naked to the invisible eye. However, there are some species of wood
that may require sanding to a finer grit before the grooves are not visible.
SAFETY NOTE! PLEASE WEAR A RESPIRATOR OR FILTER MASK WHILE PERFORMING ANY SANDING OPERATION.
Sanding should proceed as follows:
1. Remove mill marks and other surface defects using 80 or 100 grit paper. 2. Once mill
marks are removed, move up to a medium grit paper (120 or 180 grit). This will refine the
scratch pattern. To see if you have removed all of the deeper grooves left by the previous
grit paper, first blow off the sawdust then mount a lamp above the worksurface (at about a
30 degree angle). The reflecting light will show any deeper grooves that may have been
left.  Continue to sand until all the deeper grooves are removed. 3.
Continue on using 220 or 240 grit. On most woods the scratches left by 220 or 240 grit
paper will be small enough as not to be seen by the naked eye. If you can still see
scratches under reflected light, move up to a finer grit usually 280 grit.
Continue to sand until all the deeper grooves are removed. 3.
Continue on using 220 or 240 grit. On most woods the scratches left by 220 or 240 grit
paper will be small enough as not to be seen by the naked eye. If you can still see
scratches under reflected light, move up to a finer grit usually 280 grit.
Sanding Method
Regardless of the type of sanding machine you use, there are some basic rules to follow. Many texts and articles tell the reader never to sand against the grain. This is not always true. When you first start to sand using coarse paper it may be necessary to remove a lot of material because you have to remove mill marks and level the surface. Initially sanding against the grain will remove stock much quicker. Once mill marks are removed and the surface has been leveled, finish up by sanding with the grain before moving up to a finer grit. Also there are some cases where you are forced to sand against the grain. One such case is at a joint line where two pieces of wood meet at an angle. In this case it is also o.k. to sand against the two pieces, just make sure you finish by sanding with the grain up to the joint line.
Removing excess glue squeeze out.
As mentioned previously, you should use a good amount of common sense during the construction process. Removing excess glue squeeze out is a perfect example of this. Many woodworkers have a number of theories about how and when to remove glue squeeze out. One theory I do not agree with is to remove the glue while it is still wet by using a damp cloth. By doing this, you are forcing the glue down into the pores. Furthermore, if you use a damp cloth, you are thinning the glue out thus it will penetrate even deeper into the pores of the wood. This method also makes it difficult to determine if all of the glue has been removed. If the glue has not been totally removed in some areas, it will act as a sealer and prevent a stain or finish from penetrating into the wood. When the stain or finish is applied, the area in question will appear light and blotchy. Another method that works much better is to let the glue set up before removing it. As white or yellow glue dries, it first starts to skin over and form a blister. If you don't wait long enough before removing the glue, the skin will break open and deposit wet glue onto the work surface. If you wait about 45 minutes to 1 hour, the glue should be dry enough to remove easily with a paint or glue scraper. There is a way to test the glue in order to determine if it has setup to the point where it should be removed. Take a pin and prick one of the globs of glue, if the blister breaks and fresh glue comes out it is not yet ready to be removed. Wait a while longer. If the glue is left to dry hard it could be difficult to remove, however not impossible. I would still recommend using this method over the method of removing the glue with a damp cloth while still wet. A good paint scraper is the best tool for glue removal. The scraper should have a solid blade and sharp edge. It should also have a large heavy handle.
Some Final Tips!
Removing Sawdust. Use a tack cloth to remove sawdust from the worksurface. Lightly wipe the surface, don't rub hard or press down or the resin in the tack cloth will be deposited on the worksurface and may contaminate it. Start the finishing process immediately after the surface has been prepared.Humidity in a shop can start to raise the grain and if you handle the workpiece too much after it has been sanded, the natural oils in your hands may also contaminate the workpiece. Hinges, pulls and other hardware.Drill all mounting holes for hinges, pulls and other hardware before you sand and then mount the hardware to test the fit and location. Once satisfied remove all hardware before you start to sand. Do not remount the hardware until the whole finishing process is complete.
|
|

Return to Table of Contents CLICK HERE
